Tracking HubSpot Form Submissions in Google Analytics
HubSpot is widely used amongst B2B SaaS companies and form submissions are essential to track in Google Analytics 4/


HubSpot is widely used amongst B2B SaaS companies and form submissions are essential to track in Google Analytics 4/
HubSpot is one of the most widely used marketing tools in B2B companies today and one of the most used features is lead capture forms. Lead capture forms are usually used on websites for CTAs such as “Request a Demo” or “Download a copy” etc. The user is then required to fill in some details and submit the form.
It is easy to monitor these submissions in HubSpot, but what about having this data in Google Analytics? It’s important to have your conversion tracking set up in GA so you can monitor website performance and drill-down into the detail beyond HubSpot.
In this article we’ll show you a quick way to track any HubSpot form submission using GA and Google Tag Manager and create your own custom events for individual forms.
To make this work you will need to have Google Tag Manager installed on your website. It's quite straightforward to do, you can read about it here on Google's tutorial. Google Tag Manager is a really useful tool for digital marketing analytics and I recommend you use it if you dont already. It basically allows you to manager all of your custom website scripts without having to dump them all into the webpage itself, you just install tag manager and then install all the other scripts in tag manager.
Once you have tag manager installed you can move on to the steps below to setup HubSpot Form Submission tracking in Google Analytics 4.
There are only a few steps to work through to do this and the most complicated part is the Javascript but don’t worry you can just copy and paste that code.
All actions or events on a webpage are tracked in the DOM (Document Object Model). This means that using some very simple Javascript we can create something called an event listener to ‘listen’ for a specific event and then do something when that event happens. This is how we are going to track and record our HubSpot form submissions and conversion actions.
So, every time a HubSpot form is submitted it creates an event in the DOM. The specifics of these events can be viewed in HubSpot’s Form API documentation. HubSpot creates a specific event called onFormSubmitted every time a form is submitted successfully, this is the event we want to listen out for. You don't really need to worry about the details.
So how do we do that? The first step is to open up Google Tag Manager and create a new Custom HTML tag. This allows us to add the Javascript listener. Below the screenshot we have added the actual code you can copy and paste into the HTML section here.
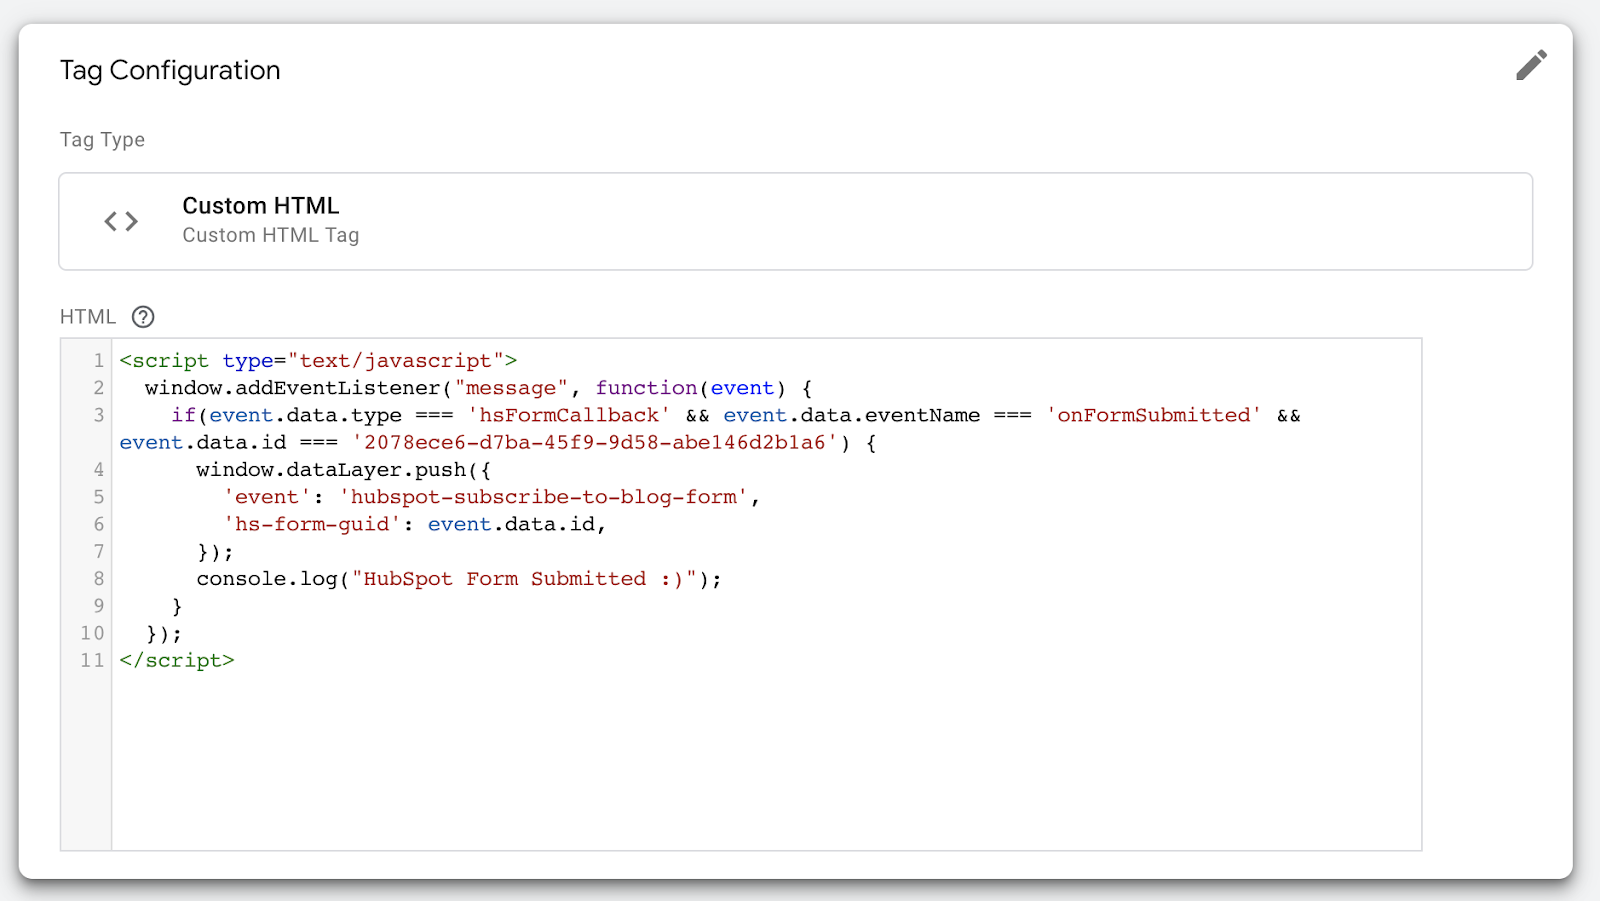
This is the most complex part of this process and if you have no experience with Javascript it may make little to no sense, but don’t worry it's quite easy to understand when it is explained...hopefully.
Ignore some of the bits of this code as it wont make sense unless you understand how javascript works. Essentially this script adds an EventListener to the window you have open and when it comes across an event with the data type equal to requirements mentioned in the question it adds a new event to something called the data layer.
A data layer is a Javascript Object (a virtual thing). It passes information from your website to Google Tag Manager so when this event happens the information is passed to the data layer.
This is code you need to copy and paste. this is what it means:
If you want to create an event that tracks ALL HubSpot form submissions you can remove the condition from the JS that says the event.data.id === “id” - the ID that you put here is the ID of the form you can get from HubSpot. So if you remove this element from the script the event will fire every time a form submission happens.
Firing a specific event on a specific form is better practice than a global form event. This is because it gives you more control over the events and the naming conventions.
The end result of this code when it is published to Tag Manager is to it creates a new event in this called "form-submission-event-name" (you can name it whatever you want). You can now use the name of this event to trigger something else, so now, we will setup a trigger using this event name.
Now you have an event listener configured and a new event created. The next step is to set up a trigger based on the event now being sent to the Datalayer. This is straightforward and only requires you to create a new custom event and add the name of the event you created in the JavaScript.

For the trigger you need to use the exact same event name you specified in the previous step in the Javascript code. This turns that event into a trigger we can then use to fire other tags in Google Tag Manager. You can do this a different method and but i think this a cleaner way of doing it.
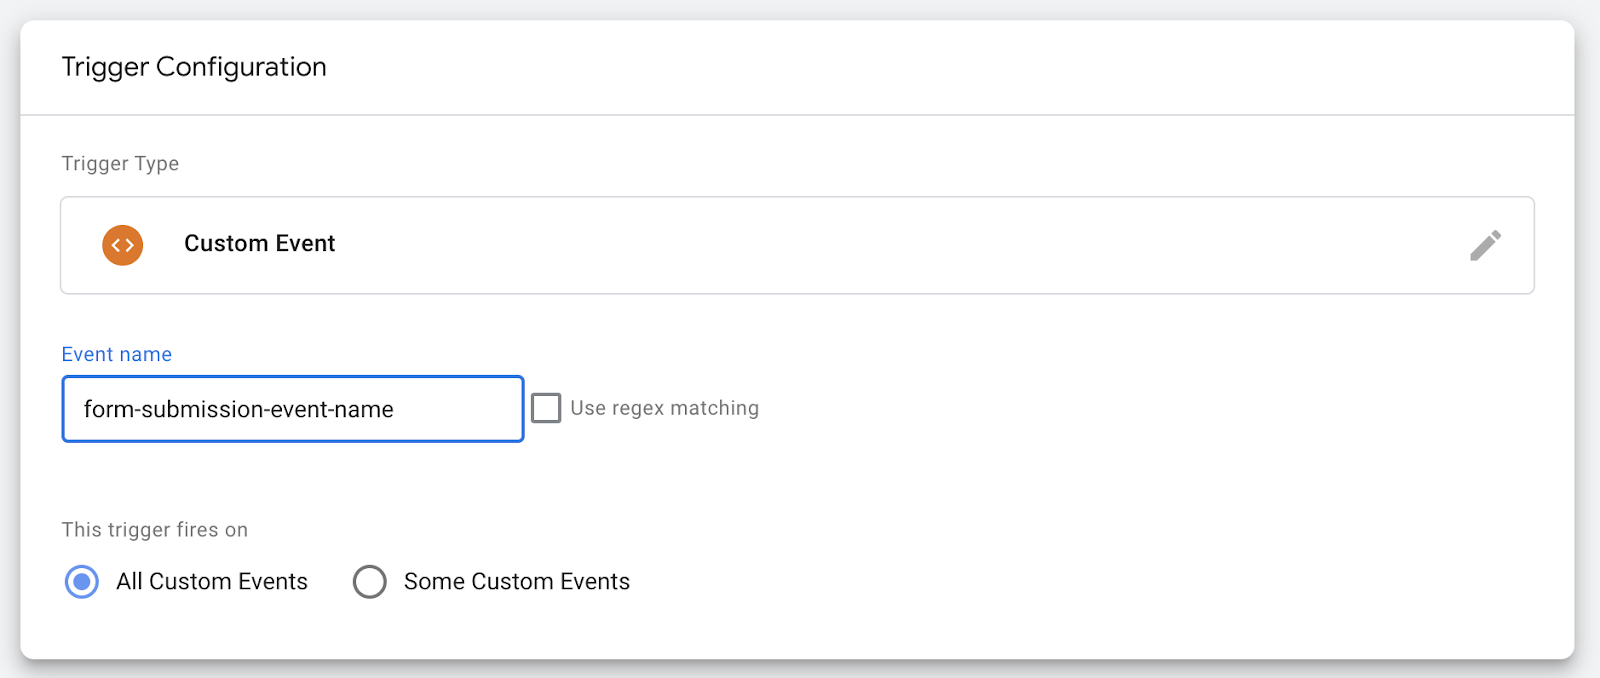
This trigger will now be used as a reference for our GA4 event. This means every time that even happens the trigger fires the Google Analytics event.
This next step is very straightforward. You should now create a new GA4 Event Tag in Google Tag Manager like shown below. Here you have to select a trigger and this is where we select the trigger we just created in step 2. Finally, give it a name - we called ours ‘Request a Demo’ for example.

Next you should preview and test this new tag on your dummy form or real form depending on how you set it up to see that the tag is firing correctly and working as designed. If it isn’t the most common issue is the naming of the event not being the same.
Once you have tested the tag and event is firing correctly in your Google Tag Manager container then you can move over to Google Analytics and see if it is appearing there. It is best to do this in the real-time view.

Once you see the event is being recorded in Google Analytics you can move to the admin area and toggle it on as a conversion if you want to track it that way, and that’s it you are done.
Most websites will only have one main conversion action but you may want to also track conversions for downloaded content or some other sign-up or registration. If you are going to expand your tracked events then you should consider the naming convention of your events and try to keep them consistent so it is easy for you to review them all in the future.
Some people don’t set up conversion tracking in Google Analytics because they can track and record all their form submissions within the tool that they created the form in like HubSpot or Salesforce.
The problem with only tracking form submissions in your CRM is that if you switch you will lose historical data. It also makes it harder to review your websites conversion rates and metrics if you are not recording conversions in Google Analytics.
You can connect Hubspot directly to your Google Ads account and import conversions from their but you can also import conversions from Google Analytics so it just gives you more flexibility and future proofing, it is deemed as best practice IMO.
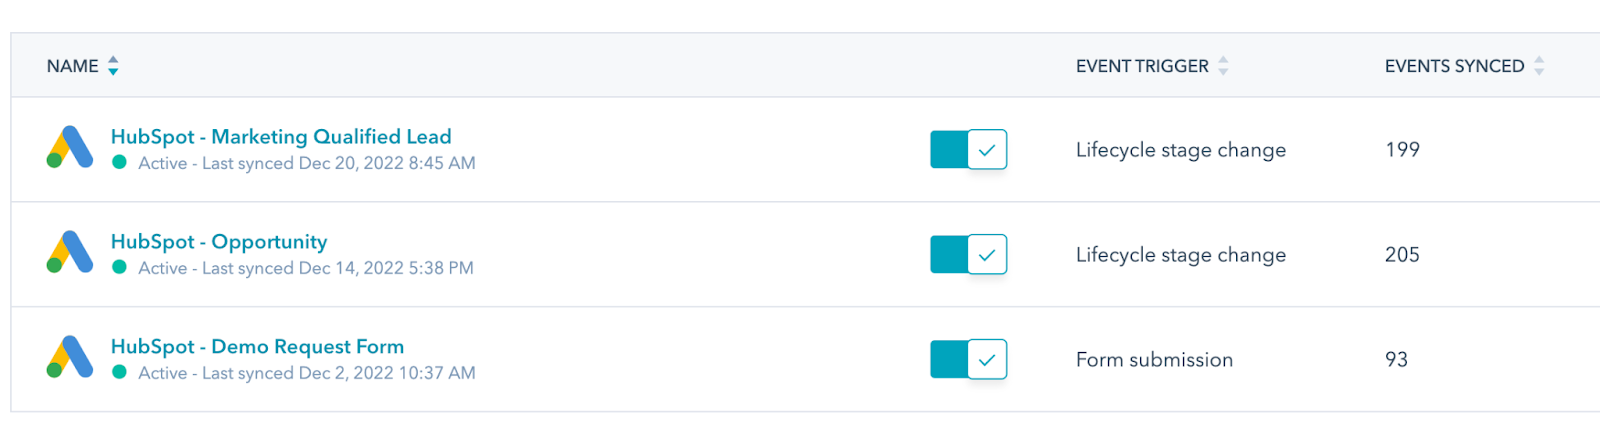
Besides setting up events in Google Analytics, if you are using HubSpot you can create custom events based on data in your CRM to optimise your conversions in Google Ads if you connect your Google Ads and HubSpot accounts.
An example below shows how I have created 3 events that have different triggers, these are then synced back into Google Ads and you can then select them in Google Ads to Optimise your ads for these conversion actions. There is a more in detail guide on this on the HubSpot knowledge base here.
Enhanced conversions is a feature in Google Ads that can improve the accuracy of your conversion measurement and unlock more powerful bidding. It supplements your existing conversion tags by sending hashed first-party conversion data from your website to Google in a privacy-safe way.
When a customer completes a conversion on your website like a demo request, you will typically receive first-party customer data such as an email address, name and some other business information. This data can be captured in your conversion tracking tags, hashed, sent to Google in its hashed form and then used to enhance your conversion measurement.
Depending on which type of enhanced conversions you use, the hashed data will be used in different ways to improve your measurement. For B2B marketers this is useful as if someone at work is signed into a company Google Account it can optimise based on this data.
The data is then used to match your customers to Google accounts, which were signed-in to when they engaged with one of your ads.
Have a look through our directory of agencies that specialise in working with B2B SaaS & Technology brands.
view the agencies
Excluding traffic from your office and staff's home addresses is recommended to ensure you are not muddying your website analytics data.

Audiences are useful tools in B2B SaaS Digital Marketing. In this article we will explore how to set them up and how you can use them.

Use this simple REGEXMATCH formula in Google Sheets to analysis your keyword research data allowing you to quickly filter out queries.
We've collated lists and directories of the best B2B SaaS marketing consultants, agencies and experts. Use our lists to shortlist your supplier of choice for your next marketing strategy.
Find an Expert


B2B Hackers Ltd, 86-90 Paul Street, London, England, EC2A 4NE